
Settings
Getting started with Skymail: set up your view and use email
Set up Skymail so you can work comfortably. This guide takes you through the appearance, your message list, and the most important email functions. You can skip individual steps and change settings again later.
Requirement: For new accounts and existing customers who want to get to know the new webmail interface. You can read the guide without signing in; the account settings described require you to sign in.
Video: Getting started in 2½ minutes
See how to adjust the view, read your emails, reply directly, and send a new message.
The video shows the German interface with German audio. Subtitles are available in the selected language.
Use full-screen view to read small labels. The video requires an internet connection.
Download video (MP4, approx. 16 MB)
The voiceover was generated with AI. Music: “First Light Particles” by Yoiyami, CC0.
In seven steps
-
Adjust appearance and readability
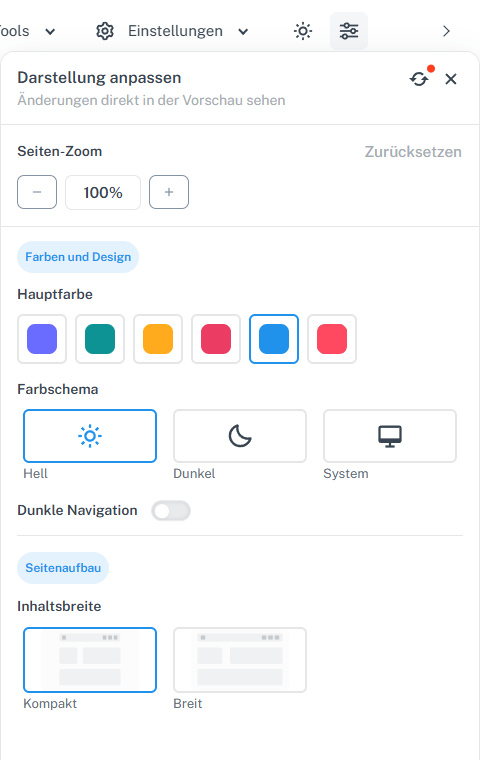
Click the sliders icon in the header. The “Customize appearance” menu opens directly below. Start with an interface that is easy to read. In the wide desktop view, look at the header at the very top after signing in. To the right of the light or dark mode icon is a button with three sliders; it has a gray background in the image. Click it. The “Customize appearance” menu opens directly below.
First select a color scheme that is easy to read: Light, Dark, or System. “System” follows the corresponding setting on your device. You can then choose the primary color and select “Compact” or “Wide” under “Content width”. To adjust the size of the entire webmail interface, the same desktop menu offers “Page zoom” with −, a percentage display, and +. Use these controls to set 80 to 130 percent in steps of ten; “Reset” in the zoom section returns to 100 percent. This page zoom is different from your browser zoom or enlarging the text of an individual email.
On a smartphone, the desktop menu with page zoom and content width is not shown. Instead, tap the sun or moon icon in the mobile header to open the “Light”, “Dark”, and “System” color scheme options. If the sliders icon is missing on a computer, make your browser window wider.
Appearance changes take effect without a separate “Save” action and are remembered in this browser on this device. Other browsers or devices may look different. Use “Reset appearance” to restore the general appearance options to their defaults; page zoom has its own Reset button. Then check that the contrast, size, and width feel comfortable; you do not need to reconfigure existing account settings to get started.
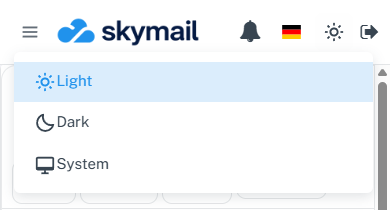
On a smartphone, open the color scheme using the sun or moon icon in the header. The desktop menu for zoom and content width does not appear there. -
Set up the message list and preview
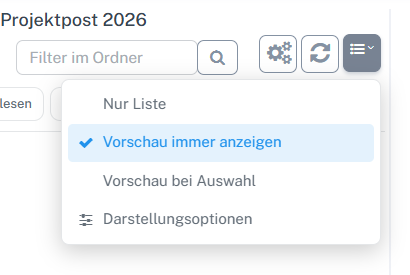
Open the button with list lines and an arrow above the message list on the right. Choose a preview mode or “Display options” from the menu. Click “Email” at the top of webmail and open the inbox or one of your own folders on the left. Above the message list on the right is a dark button with list lines and a small downward arrow. Click it; the first image shows this exact button and its open menu. “List only” uses the space for subject lines. “Always show preview” displays the reading pane beside the list on wide screens. “Preview on selection” starts with the list and opens the reading pane only after you select a message. Choose whether you prefer more space for the list or reading alongside it.
A choice made directly in the list menu takes effect immediately. For further settings, select “Display options” at the bottom of the open menu. The second image shows the dialog; choose the preview mode under “Email view” and confirm with “OK”. On a smartphone, a small monitor icon labeled “Display options” appears above the list on the right instead; the side-by-side desktop preview is not available there. A new or empty mailbox may not yet contain a message to try this with.
The “Display options” dialog contains further list settings. “Grouping” arranges the list by your selected criterion; use the dashed entry to turn grouping off again. “Messages per page” determines how many messages a loaded page shows. “Email list”, with “Compact” or “Wide”, changes the spacing of list entries, not the width of a freely resizable column. “Date” offers “Normal” and “Short” in wide desktop views. Confirm changes in this dialog with “OK”. List spacing and the date format are remembered in the browser you use; grouping and page length belong to the folder settings.
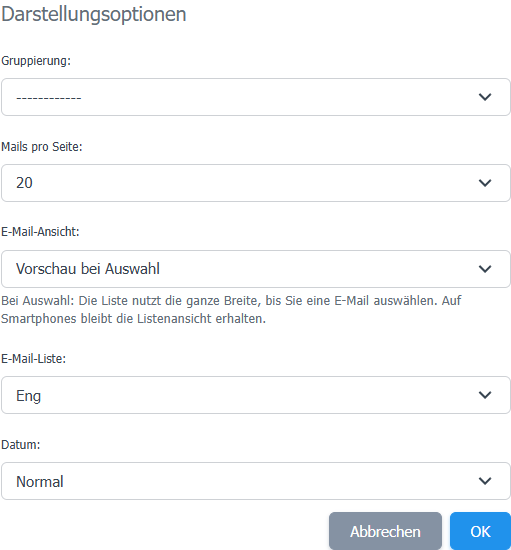
The list options show the preview and further values; changes in the dialog are confirmed with OK. -
Read, write, and reply to emails
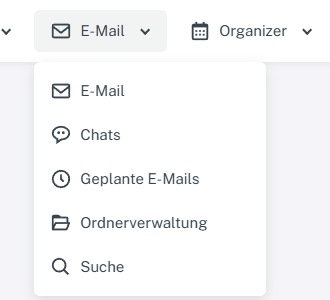
Open “Email” at the top and select “Email” again from the menu to reach your mailbox. On a computer, click “Email” in the header, then select “Email” again in the menu that opens. Open the inbox on the left. The first image shows the entry point through the header menu. Select a message to open it in the preview or reading view, depending on your view setting. In the desktop preview, you can move to the next or previous message without returning to the folder overview each time. If your new mailbox is still empty, that is normal: you can already set up the interface and follow this step later using a message of your own.
“New email” opens the compose window. Enter the recipient, add a meaningful subject, and write your message. Before selecting “Send”, check the address and attachment especially carefully. A send confirmation in the interface tells you that the webmail sending process was accepted; it does not confirm that the message reached the recipient's mailbox. To include a file, add it in the compose window and check that it appears in the attachment bar before sending.
Under an appropriate open email, you will find “Write a quick reply”. The field supports multiple lines; press Enter to start a new line. Check the recipient, then select “Send”. If you need additional compose functions, use “Open in editor” to switch to the full editor. This may be necessary for protected messages or certain security requirements. If the sending status is unclear, check the “Sent” folder before sending the same reply again.

Quick reply provides a multiline field and a way to switch to the full editor. -
Organize messages and work faster
Open “Email” at the top and select “Folder management” below it. As your inbox fills up, you can create your own folders. On a computer, click “Email” in the header, then “Folder management” in the menu; the image shows both labels. Give the new folder a clear name and confirm its creation. You can select one or more emails in a message list. The selection bar then shows available actions, such as Move. When moving a message, select the desired destination folder and check that the message appears there afterward. For connected email accounts, you can also drag messages onto a destination folder in suitable desktop views, if your account permits moving them. To find a message, use the search field in your mailbox; the search at the top of the public support portal searches help articles only.
If you prefer using the keyboard, you can shorten some steps in the desktop list. First click in the message list; normal text-entry commands apply inside a text field. In the appropriate desktop view, the arrow keys move between messages, Enter opens the selection, and / focuses mailbox search. Ctrl+A selects the currently loaded list or page, not automatically an entire folder with further pages. Press ? to open the built-in shortcut overview. Copy and paste behavior differs between mailbox areas; start by relying on the visible actions.
On a touch device, mobile webmail also provides swipe gestures for certain message actions. These are optional; the visible buttons remain an alternative. The native Skymail app may use different swipe assignments. Only try gestures on a noncritical message of your own, and watch the displayed notification when deleting or undoing.
-
Secure access and recovery
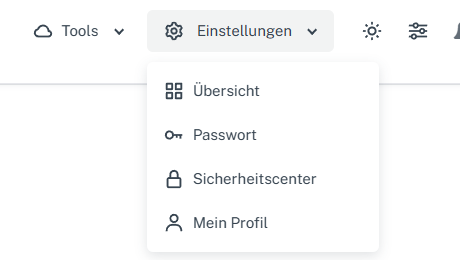
Click “Settings” at the top, then “Security center” in the menu. On a computer, click “Settings” in the header and select “Security center” in the menu; the first image shows the complete click path. On a smartphone, first tap the menu icon with three horizontal lines at the top left, then “Settings”, and finally “Security center”. You can already see the three-line icon in the mobile header image in the first section; the second image here shows the expanded mobile menu. First check which sign-in methods are already set up for your account. A passkey can be stored on your device or in a password manager. A hardware security key is a separate physical device. Both are used for signing in; before registering a new passkey, make sure you understand what confirmation the device requires and how you will regain access if the device is lost. Keep an existing access method until setup is confirmed and you have successfully signed in with the new passkey.
Backup codes and the Account Recovery Key serve different purposes. A backup code can be used once for sign-in or recovery and then becomes invalid. Creating new backup codes replaces any previously unused codes. Store them securely, preferably offline. The Account Recovery Key is a separate recovery method; it is neither a passkey nor an OpenPGP key. Do not generate or replace existing recovery information just to try it out. First check what you have already stored safely.
If you forget your password, start with “Forgot password” on the sign-in page. Depending on the details you have saved, you may be offered a security email, SMS, backup code, or recovery key. SMS is only available if an appropriate number is set up for your account and the function is available. If you cannot use these methods, the help leads to manual account recovery. A requested email or SMS can be delayed; only confirming the new password and successfully signing in shows that access works again.
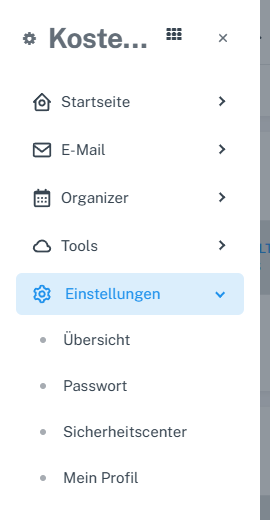
On mobile: open the menu at the top left, expand “Settings”, and tap “Security center”. -
Optional: protect emails with OpenPGP
OpenPGP is an optional advanced feature. You do not need it to read and write ordinary emails. Encryption allows only someone with the matching private key to read the content; signing lets the recipient check a message's origin and whether it has been altered. An OpenPGP key is not a passkey for account sign-in or an Account Recovery Key. Depending on your account group, the OpenPGP feature may first need to be enabled.
To use OpenPGP, first check whether a key pair already exists. Do not rush to generate another one. When creating a new key pair, the passphrase, the private key backup, and the revocation certificate belong together. Keep private keys and the passphrase secure and do not share them. The public key, by contrast, may be sent to people you communicate with. For encrypted messages, you also need the recipient's verified public key.
Setup alone does not automatically encrypt every outgoing message. When composing, pay attention to the available encryption and signing options, and check the status before sending. A message shown as sent does not automatically confirm delivery to the recipient or their ability to decrypt it. The detailed guides take you through the individual steps and explain the requirements.
-
Find help again and discover more features
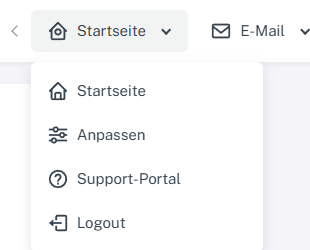
Click “Home” at the top, then “Support portal” in the menu. You can reopen this guide at any time: on a computer, click “Home” in the header, then “Support portal” in the menu. The image shows both click targets. On a smartphone, first open the menu with three horizontal lines at the top left, then select “Home” and “Support portal”. The public help homepage offers topics and a search field. For example, search for “Preview”, “Passkey”, or “Forgot password”. Help portal search contains published guides; it does not include personal emails or support tickets.
You can save the public help in your browser for offline use. This covers the approved help pages and images in the relevant package. It does not make your mailbox, personal tickets, or account sign-in available offline. After the help is updated, download the offline package again so it includes new articles. If a saved page is missing, open it while connected and check the status on the offline help page.
Later, you can explore other areas such as chat, Organizer, or Files as needed. To get started, it is enough to choose a readable appearance, understand the message list, and find your way to reading, writing, and replying. Also check which security and recovery methods already exist for your account. You do not need to set up additional features or OpenPGP to get started.
What you will see afterwards
You now know the main routes through Skymail: an appearance you can read comfortably, a suitable message list, reading and replying to emails, and the available security and recovery options. Use the links in each section to explore individual tasks at your own pace later.
Common problems
- An option mentioned here is missing? The areas shown can depend on screen size, account group, and which features are enabled. First check that you are in the described area and using the appropriate device.
- A change has not taken effect? Confirm with “OK” in the list dialog; the general appearance controls take effect directly. If necessary, reload the page and check the value again.